1. SPECIFICATION
Truss (Tie Beam) spacings will determine the size of brandering to be used.
1. SPECIFICATION
Truss (Tie Beam) spacings will determine the size of brandering to
be used.
|
Truss spacing |
Brander size |
| Up to 1 000 mm | 38 mm x 38 mm |
| 1 001 mm - 1200 | 38 mm x 50 mm (with 50 mm dimension vertical) |
| 1 201 mm - 1400 | 50 mm x 50 mm or introduce extra tie beams |
| Type of ceiling | Brander Centres | Rhinoboard Fixing |
| 6,4 mm Rhinoboard M-Strip | 400 mm centres in one direction only. | 32 mm Galvanised semi-clout nails or 32mm grabber screws spaced at 150mm centres. |
| 6,4mm Rhinoboard Gypsum Plastered Ceilings | 300 mm centres in one direction only. | 32mm Galvanised semi-clout nails or 32mm grabber screws spaced at 150mm centres |
| 9,5
mm Rhinoboard Flush Jointed Ceiling |
500 mm centres in one direction only. | 38mm Galvanised serrated nails or 32 mm grabber screws at 150 mm centres. |
| 9,5 mm Rhinoboard Plastered Ceiling | 400 mm centres in one direction only. | |
| 12,5mm Rhinoboard Flush Jointed Ceiling | 600 mm centres in one direction only. | 38mm Galvanised serrated nails or 32 mm grabber screws at 150 mm centres. |
3. FIXING
OF BRANDERING
Brandering is nailed to the tie beams at centres indicated on the table on the
previous page using a 75-100 mm nail. In all cases a brander should be provided
at 38 mm centres away from wall line for fixing 75 mm Cove Cornice. (See data
sheet for Rhino Cove Cornice for further details.) Level the brandering, starting
from the lowest point.
Insert a wedge in the gap between the brander and the tie-beam and secure the
brander with a skew-nail. In cases where the gap exceeds 13 mm the use of a
cleat is recommended. (See Fig. 1 & 2.)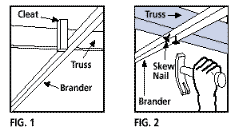
NB: Light fittings must be fixed to the brandering or
con-duct not directly to the board.
4. RHINOBOARD
RHINOBOARD must ALWAYS be fixed with the length of the board at RIGHT ANGLES
to the brandering. RHINOBOARD is fixed with the printed side up (face side down)
for direct decoration or for plastering. Always nail or screw from the centre
of the board outwards. The gap between boards should not exceed 2 mm.
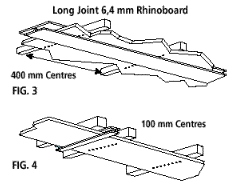
4.1 6,4 mm RHINO M-STRIP
Fix the first board up to 150 mm from long edge. Slip RHINO M-STRIP over the
edge of the board with the narrow flange facing down. Slip second board into
RHINO M-STRIP and fix both boards to within 25 mm from RHINO M-STRIP. (RHINO
M-STRIP is not fixed at all.) In the case of end joints fix 2 parallel branders
at 100 mm centres with the ends of both boards overlapping the respective branders
by +-30 mm. (See Fig. 3 & 4.)
4.2 RHINOBOARD GYPSUM PLASTERED CEILINGS
Fix RHINOBOARD at right angles to branders so that the end joints fall on a
50 mm brander. No brandering is required behind long edge joints. Nail at 150
mm centres. Apply Fibatape over all joints, double over butt joints. If wire
scrim is used, fix with staples or nails. (See Fig. 5). Apply 3-6 mm of RHINOLITE
or Cretestone as per data sheet for Rhinolite and Cretestone.
NB: The ceiling must be plastered the same day that the RHINOBOARD has been
erected. On large areas check with Engineer to determine if expansion joints
are required.
4.3 9,5 mm and 12,5 mm RHINOBOARD FLUSH JOINTED CEILINGS
Fix Taper-edge RHINOBOARD at right angles to brandering so that the butt joints
fall on a 50 mm brander. Nail or screw at 150 mm centres. All joints should
be jointed as per data sheet for Rhino Drywall Hand Jointing Application.
5. DECORATION
(a) M-Strip Ceilings
Stop all nail and screw heads and sand down when dry.
(i) Galvanised and Aluzinc M-Strip
• Lightly sand to create a key.
• Apply one coat of poly-vinyl butral etch primer.
• Apply two coats of P.V.A.
(ii) Chromaprep M-Strip
• Lightly sand to create a key. Be careful not to remove the chromaprep layer.
• Apply two coats of super acrylic P.V.A. directly to surface.
(iii) Plastic M-Strip
• Sand to create a key.
• No primer necessary.
• Apply two coats of super acrylic P.V.A.
(b) Re-inforced Plaster Ceiling
Before decorating check the entire surface carefully to see that the plaster
has set hard and is dry and free from powder/dust. It is recommended that all
gypsum plaster surfaces be sealed with an oil or solvent based sealer such as
paint bonding liquid or a pigmented plaster primer suitably thinned down with
mineral turpentine. Allow to dry for 24 hours before applying two coats of paint
as required.
(c) 9,5 mm and 12,5 mm RHINO DRYWALL CEILINGS
For improved paint finishes, it is suggested that a good quality plaster primer
be used on the entire surface.

NOTE
All sizes refer to 38 mm x 38 mm SABS approved
S.A. Pine or 32mm x 32mm SABS approved Saligna brandering.
* Staples are not recommended to secure board to branders.
* Training videos are available.