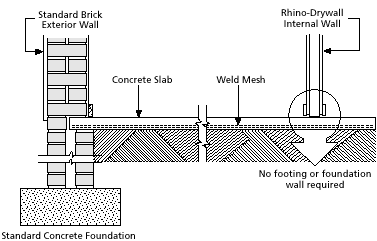
DESCRIPTION
This system is essentially a conventional house building system which incorporates
Rhino-Drywalling internally in place of the internal brick walling.
ADVANTAGES
Cuts building costs.
Cuts building time.
Easier and quicker installation of services.
Allows flexibility in design and size of rooms.
Superior finish. Increases habitable space.
Internal walls can be relocated.
No Internal Foundations Required
CONSTRUCTION SEQUENCE:
1. Set out, dig, concrete and erect external foundation brick wall only.
2. (a) Fill and pour floor slab.
(b) It is suggested, as in good building practice, that a polythene sheet be
laid under the concrete slab. (c) The floor slab should be floated to a smooth
level finish.
NB: Earth Filling to be free of clay constituents and to be well watered and
compacted.
3. Erect external 220 mm brick wall. (No unsupported brick wall should exceed
9 metres.)
4. Erect roof trusses (connector plate) and roof covering.
5. Plumbing and electrical services should be installed in the 220 mm wall at
this stage.
6. (a) Plaster internal face of brick wall or, alternatively, dryline with Rhinoboard.
(b) Glazing recommended at this stage.
7. (a) Fit Rhino-Drywall floor and ceiling tracks as per floor plan.
(b) Erect ceilings at this stage if possible, otherwise at the usual stage of
construction.
(c) Erect Rhino-Drywall. See drywall shower specifications and/or Rhinoboard
bathroom, kitchen and laundry details.
(d) Internal plumbing and electrical installation during framing and cladding
of Rhino-Drywall.
8. Apply a P.V.A. undercoat and further finishings as normal.
NB: Refer to NBRI Report C/BOU 639 and Drywall Data Sheets.
All the above operations should be carried out in accordance
with good standard building practice.