Innovative
New BPB Gypsum Pre-formed Light Troughs
BPB
Gypsum's latest exciting product is designed to allow the creative minds
of today's architects even greater freedom. BPB Pre-formed Light Troughs
create the effect previously only available to those few working on unlimited
budgets. As well as providing a new concept in ceiling lighting and decoration.
Thanks to BPB Gypsum's new moulding technology, light weight yet exceptionally
strong mouldings / bulkheads can be pre-formed to eliminate on site construction.
Pre-formed Light Troughs are backed by BPB Gypsum's extensive distribution
network, enabling anyone, anywhere to install a masterpiece.
Features and benefits
1. The pre-formed sections ensure that the profile
is consistent throughout the job.
2. Alignment keys at each end of the sections ensure perfect alignment
and cut down on the finishing time required.
3. The innovative new moulding technology used provides an unheard of
reduction in weight, allowing one person to handle a full 2,4m section.
4. The same exciting new technology also provides an extremely strong
and rigid section that is almost unbreakable through normal handling.
5. The pre-formed sections cut the installation time down by as much as
75%.
6. The specifier can now rest assured that the profile he has specified
will be installed consistently time and again.
7. The greatly reduced installation time means much less disruption to
owners and tenants during revamps and renovations.
8. The pre-formed sections weigh less that 35% of the weight of an equivalent
section using conventional construction methods.
9. Due to the rigid nature of the sections the installation will always
be true and straight, with no worrying about finishing off corner beads
with Rhinolite.
10. As the lighting is concealed a more economical light fitting can be
used, further reducing costs.
11. The sections are supplied completed. This means less time is spent
working out material quantities.
12. The pre-formed reflector cove ensures an even distribution a light
along the whole length of the section.
BPB Pre-formed Light Troughs are available in three standard profiles
with two radii of reflector cove in standard 2,4m lengths.
Installation Guide for
BPB Gypsum Pre-formed Light Troughs
The BPB Pre-formed Light Trough is designed to provide a quick cost-effective
solution to the ever-increasing demand for such features. The pre-formed
sections will provide the level of finish and accuracy required for todays
fast track contracts.
STEP 1 : REFLECTOR COVE
Fix the required BPB reflector cove into the corner, between the wall
and the ceiling with Rhinobed and suitable screws as per the standard
fixing methods for a conventional BPB cornice. Each section of BPB reflector
cove has a keyed splice at each end. A layer of Rhinoglide should be applied
to each joint before fixing the sections next to each other, this will
allow the Rhinoglide to be forced out of the joint and provide a strong
joint. Care should be taken to ensure that the face of the reflector cove
is aligned, to provide a smooth surface. The surface of the reflector
cove can now be finished off with fibatape and Rhinoglide as per the standard
drywall jointing method. It should be noted that the front edge of the
Reflector cove is tapered to allow a smooth integration into a flush plastered
ceiling.
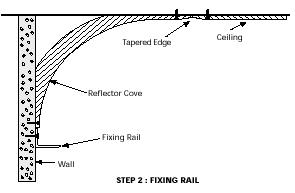
STEP 2 : FIXING RAIL
Fix a rail of 25 x 25mm galvanized angle (or similar) to the wall directly
below the bottom edge of the already installed reflector cove. This should
run the whole length of the light trough, as it will be used for support
brackets and cabling. It is important that this rail is securely fixed,
as it will be subjected to considerable tensile forces.
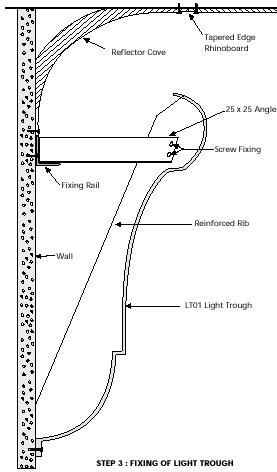
STEP 3 : FIXING OF LIGHT TROUGH
The BPB Pre-formed Light Trough shall be fixed to the wall, at 150mm centres,
by suitable means through the lower reinforced lip. The rigid nature of
the pre-formed section will mean that any imperfections in the straightness
of the wall will have to be filled, do not try and bend the section to
fit the wall exactly. Suitable lengths of 25 x 25mm galv angle should
be used to tie back the light trough section to the fixing rail installed
previously. They should be bolted or screwed through the reinforced ribs
cast into the back of the light trough section.
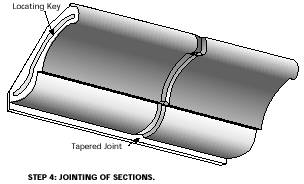
STEP 4: JOINTING OF SECTIONS.
All BPB Pre-formed Light Trough sections have a keyed splice at each end.
The keyed joint should have a layer of Rhinoglide applied to one side
before the two sections are joined to provide a stronger joint. The two
light trough sections should then be butt jointed against each other using
the key section to ensure an aligned joint. The two reinforcing ribs that
are now against each other should be fixed by means of an m6 galv gutter
bolt, forcing out the excess Rhinoglide between the joint. The tapered
edges of the BPB Pre-formed Light Trough can now have Fibatape applied
and be jointed as per the standard drywall jointing method.
STEP 5 : CUTTING AND MITRING
Mitring scribes are available for all BPB Pre-formed Light Trough profiles.
It is strongly suggested that these be used as the light troughs are large
complex sections and a mitre cut incorrectly will result in large unsightly
gaps that will require extra work to correct. Both the reflector cove
and the light trough can be cut using a conventional wood saw or other
suitable means. Each mitre should be treated individually in the same
manner as a conventional BPB cornice. Once the section is cut and installed
the back of the mitre should be reinforced using Fibatape and Rhinobed.
The Fibatape should be placed in strips across the joint with a further
piece being placed on top running along the length. The Rhinobed should
then be applied to the fibatape generously to provide a strong joint that
under normal conditions will not crack. If a large amount of movement
is expected, small lengths of 25 x 25mm galv angle can be used to tie
the two sections together, in addition to the Fibatape and Rhinobed.
STEP 6 : FINISHING OFF
The surface of both the BPB Pre-formed Light Trough and the reflector
cove should have any surface imperfections corrected and then be primed
with a good quality plaster primer. It should be noted that the reflector
cove especially will be subjected to very critical lighting and surface
preparation is of the utmost importance to ensure an aesthetically pleasing
finish. The sections can now be painted and are ready for the fixing of
lights etc.
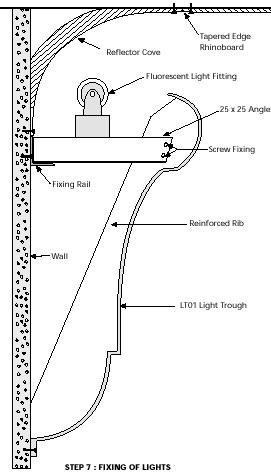
STEP 7 : FIXING OF LIGHTS ETC.
The 25 x 25mm angles used to tie the BPB Pre-formed Light Trough back
to the fixing rail can be used to support a standard fluorescent strip
of light. If other items such as heavier lighting or even pot plants are
going to be used they should be supported independently of the light trough.