|
 Balustrades Balustrades |
The
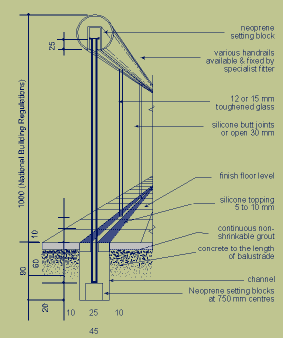
freestanding system has been developed specifically
to provide an inexpensive method of utilising the ease
of maintenance and aesthetic beauty of glass. Only the
bottom edge is set into the floor, thereby eliminating
the need for costly framing and fixing. The result is
a continuous all glass balustrade of exceptional Armourplate
strength that is easy to specify and equally easy to
install for internal or external applications.
|
Installation
instructions |
|
Preparation
of Channel/Groove
|
Preparation
of Channel/Groove
The pre-formed groove should be thoroughly cleaned and
saturated with water for 24 hours prior to grout application.
Immediately before laying grout remove all surface water
and any remaining debris from the groove.
For a channel formed from steel sections in or on a
concrete floor, all steel surfaces should be cleaned
and primed prior to installation. The channel or groove
should be clean and free of obstruction.
Positions of joints between glass and panels should
be measured and marked before starting work.
Neoprene setting blocks 20mm thick, 25mm wide and 100mm
long should be located in the channel or groove at 750mm
centres.
These may be placed diagonally in the groove to ensure
firm support for the glass panels.
In
their final positions, make sure the glass panels are
centered in the groove, vertically aligned and with
vertical joints consistent between 3mm and 6mm.
Use neoprene spacer blocks to achieve centering in the
groove.
Use packing, if necessary, beneath the panels to achieve
consistent vertical joints.
Use neoprene spacers at the joints to avoid glass-to-glass
contact during installation.
|